Showing posts with label nail polish. Show all posts

Wednesday, January 20, 2016

Red and Nude Nails

Hello everyone!

   I know this is a kinda late post about this matter, but I came here talking to you about my New Year's Eve that I wore this last time. 

   I chose some simple, but beautiful and delicate nail art, that didn't end up being perfect, but the final result was pretty. 
   But I went completely insane! A couple of weeks before these pictures were taken I completely cut and filed my nails. They were so, but so small! In these photos they already have a little growth compared to my previous post (Grey Nails). I don't really like wearing around squared nails 'cause with my lifestyle I always end up breaking them in the corners. They start to be uneven and well... I always, honestly, end up chopping them off in no time!
   Well, I know it is according to my lifestyle, because I make sure they are as strong as they can be! All you need to do is follow simple 5 tips: 
  1. Always keep a good pair of washing up gloves at hand. At some point, water is your enemy. Water weakens the nails and can cause them to split, peel and break after a long exposure.
  2. Moisture, moisture and moisture! Always use a good hand cream, keep it close by and apply it after washing your hands.
  3. Choose a nail strengthening product. There are thousands of possibilities in the market.
  4. Use a good cuticle oil. Keeping your cuticles healthy is also another big deal. Use it regularly, allowing your nail to grow properly.
  5. Drink lots of water. Not only for your nail's health, but also for your general health, drinking at least 2 liters of water a day is essencial.
   To make these nails you don't need a lot of things, only:
  • A regular base/top coat nail polish.
  • Red nail polish,
  • Silver nail polish.
  • Nude nail polish.
  • Toothpick or a striping brush.
  1. After taking care of your nail apply a base coat and let it dry completely. 
  2. Paint 3 of your nails red and 2 nude. Make sure you apply at least two layers of polish and let each one dry.
  3. With a toothpick or a striping brush make on each nail a triangle with silver polish.
  4. Again, with a toothpick or a brush, make a V shape on each nail using the opposite color that you've used before. 
  5. Top coat it and let it dry.
   And that's it. Super easy and fast to do. 
   Hope you've enjoyed. 

  Kisses, 
  Patrícia


Wednesday, January 13, 2016

Grey Nails

Hello everyone! 

   First of all, I wish all of you a wonderful year of 2016. Full of health, happiness and wealth. 

   I've been working in this past December, so I wasn't able to paint my nails at all... But, I'm back to you with some gorgeous squared nails, painted grey and decorated with some fashion studs. 

   Don't they look beautiful?
   All you need to do is:
  1. After you take a good care of your nails, apply a base coat and let it dry.
  2. Paint your nails two coats of grey. Let your nail polish dry perfectly between each coat.
  3. With a toothpick and a little clear polish, pick up little squared studs and put them on your nails evenly. I made a line with studs on my ring finger and thumb. 
  4. Apply a generous amount of top coat and let it dry.
   As simple as that! And they look gorgeous!
   Kisses,
   Patrícia 


Wednesday, November 18, 2015

Where do I buy my tools?

Hello everyone!

   In all of my posts I'm always talking about some kind of tools, dotting toolsstriping brushes and so on. But, even though I already made a post about these tools (Daily tip - Nail art tools) I never actually told you where I get mine.

   As you know, any beauty supply store can sell any kind of tools you need and it's the same thing here in Portugal. However, they are insanely expensive (at least in my opinion, 'cause I have a low budget). So I needed to look for another option. I searched for other stores, I saw reviews and so on, until I reached this conclusion: the cheapest way to buy tools is to get them from eBay!
   I've already bought tons of stuff on eBay. Not only nail art tools and accessories, but also stuff from another category, such as electronics and pet supply.
   It's not hard to use and I think it's a trustworthy website. All you have to do is to create a new account, search the item you're looking for and chose the best option for you. To pay you can either use your PayPal account or you can pay with your credit or debit card. I don't have a PayPal account, nor a credit card, but here in Portugal my bank gives me the option to create a "temporary credit card" where I can use it to pay my items and no one, except for my bank, has access to my bank details.
   The only thing that ain't that good about eBay, is the time you have to wait until your item arrived it's destination.

   I believe this is some useful information. Some of you must be scared to buy things from the internet but I think that with evolution comes internet safety. You must be careful to not be fooled, but either ways eBay is great!

   Kisses,
   Patrícia

Wednesday, November 11, 2015

Stud Nails

Hello everyone!

   How are you all today? Hope you're doing fine!
   This week I come with a really simple and pretty nail art. It's the very first time that I use studs on my nails. I bought them from eBay here. I bought a box with 1200 pieces of studs, with 6 different shapes in gold and silver. They are amazing and super cheap. The one thing that I'm actually hating the most about eBay is that my items take forever to arrive... But I think that is due to Portugal's mail posting services, they're not very efficient (no offense!).
   Without further ado I present you my weekly nails: Stud Nails!

   They are super easy to do and they look simply gorgeous!
   To do this nail art you will need:
  1. Base/Top coat.
  2. Nude and silver nail polish.
  3. Blue and white nail polish.
  4. A striping brush or a toothpick.
  5. Studs.
  6. Nail glue (optional).
   All you need to do is:
  1. Take care of all of your nails, wash your hands and apply some base coat to protect your natural nail. 
  2. Paint your nails two coats of the color you please. I used some nude shade nail polish for all of my nails, except for my ring finger, which I painted with some glittery silver nail polish.
  3. After it all dried out, I started to draw on my middle finger. First I draw a triangle on the bottom of my nail with silver nail polish and filled it in. Next, I draw two lines on the top of my nail, to make a V shape, with the same nail polish. I've let it dry for a few minutes.
  4. I filled in the V shape with some blue nail polish and made 4 white stripes, 2 on each side of the V shape (like is shown in the picture).
  5. For my other nude nails I applied some nail glue near the cuticles and applied one squared silver stud on each nails. I used a toothpick with some top coat to help me pick up the studs and place them. 
  6. After you're satisfied with the result, apply some top coat onto all of your nails.
   And that's it! I hope you've enjoyed this week's nail art, 'cause I'm loving it!

   Kisses,
   Patrícia


Wednesday, November 4, 2015

Square Nails and Manicure

Hello everyone! 

   And welcome November! I hope you all had a great week and you're living a happy life!

   Last week, in my previous post, Red Nails, I told you all that I decided to change the shape of my nails from rounded or oval that I usually wear, to square. As you all know, there are a lot of shapes that you can give to your nail, but I really thing that this is something that only you should judge and only you should choose what you should or shouldn't wear. You have to think about your life style, you have to think if you usually wear short nails or long nails, if you have strong or weak nails, and so on... You can choose between square, squoval, rounded, oval, almond, ballerina or stiletto nails, or even another one that I haven't named.
From Eyeheartpolish
   Regardless of the shape you give to your nail, you must be sure that you give your nails a proper treatment. You must keep them moisturized, clean and filed. You should let your nails breathe for once in a while. I usually stay a couple of days with no polish to let them breathe. 
   Here are my natural nails after a manicure:

   To do a proper manicure you should follow a few steps:
  1. Remove your old nail polish, if you had one.
  2. Cut your nails with nail clippers (if you want to, you can skip this step - I never cut my nails) and file them the shape you wish them to have. Make sure you don't cut your nails way too short, leaving at least a small tip of white nail. Do not file your nail too harshly. Gently pull your nail file across the nail.
  3. Buff your nails. Buff the surface of your nails a little bit, to smooth it and make it even. Remember to not buff your nail too much, or you will weaken them.
  4. Wash your hands to remove any dirt, dead skin or dust that would be on your nails.
  5. Push your cuticles. Apply a cuticle cream/oil or a cuticle dissolver and gently push them with a cuticle pusher. Do not remove your cuticles!
  6. Moisturize your skin, nails and cuticles. Apply some lotion around that area and gently massage it. Use hand cream to keep your skin beautiful.
  7. After this step you can re-paint your nails or you can let them breathe. 

   My nails aren't perfectly squared yet because I had oval nails, but I'll keep getting them filed so they get the perfect shape. 
   
   Hope you've enjoyed this post.

   Kisses,
   Patrícia


Wednesday, October 28, 2015

Red Nails

Hello everyone!

   So, as you can see in my previous posts I usually wear round or oval nails... But, I don't know what went through my mind, I wanted to change! So I filled my nails until they were fair and square. Ahah. Although I already broke one of my nails before I painted them, so far so good.
   For my color, this week I chose something really simple. I chose fire, I chose love and passion, I chose red. So here are my nails of the week: 
    With a simple white nail with a red heart on my ring finger and a red nail with a white heart on my thumb. I'm enjoying this simple nail art so much! 

   Even thought they are extremely easy to do, here's the tutorial.
   You'll need:
  1. Base and Top Coat
  2. Red Nail Polish
  3. White Nail Polish
  4. A dotting tool or a toothpick.
   And it's as simple as:
  1. Take a good care of your nails and apply a base coat.
  2. Apply two coats of red polish on all of your nails except for your ring finger, paint it white.
  3. With a toothpick or a dotting tool make a tiny heart at the center of your nails, red on your ring finger and white on your thumb.
  4. After it all dried perfectly, apply top coat to seal in your design.
   
   Couldn't be easier!

   Hope you've enjoyed this post.
  
   Kisses,
   Patrícia

Wednesday, October 21, 2015

Daily Tip - Keep Your Nails Pretty!

Hello everyone!

   Our nails need some extra care so they don't break nor lose their shine. So here's some tips and tricks that you can use to make your nail polish last longer and keep your nails pretty:
  1. Always wear gloves when dealing with chemical products. Some products can make your nails lose their natural shine or even weaken them.
  2. Never use your nail as a tool. Try not to open cans or rip off something with your nails.
  3. Be extra careful when you're opening doors or drawers. 
  4. Keep your hands and cuticles moisturized. Moisturize is so important to your nails as it is to the rest of your body.
  5. Do not bite, chew off or hardly remove your nail polish without the proper treatment. You should always wear nail polish remover and a nail file to do it right.
   I hope you've found these tips useful.

   Thanks!
   Patrícia

Wednesday, October 14, 2015

Pink Scroll Nails

Hello everyone!

   Here I am, after a whole year without posting anything! Haha, I'm so sorry. I haven't painted my nails in weeks or even months, and I wasn't inspired at all.
   BUT!...
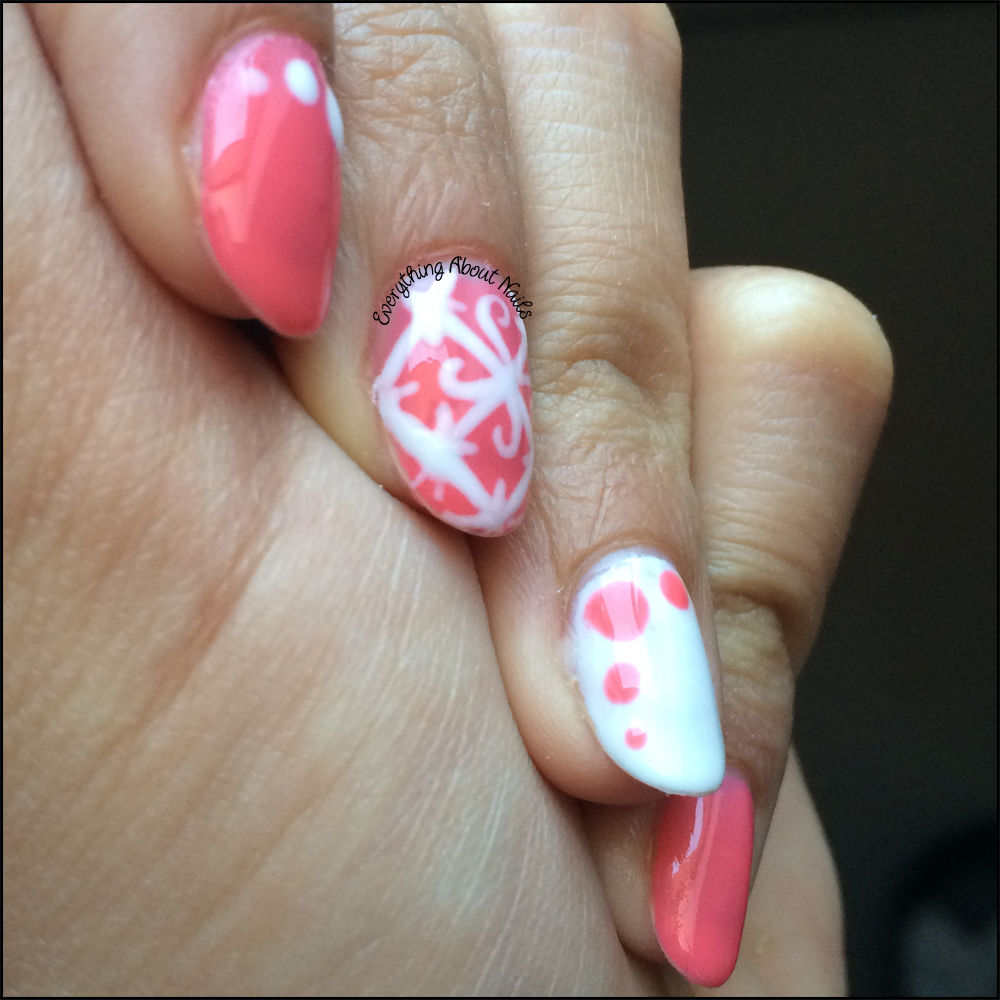
   Today I bring you my nails of the week... Pink scroll nails!
   They're some beautiful pink and white nails, with some scroll pattern on it (or at least I tried ahah).
   They are really easy to do, and I, as an amateur, took no more than an hour to do both hands. Waiting for them to dry, layer after layer really is the boring part. But it's necessary.

   To do this gorgeous nails you will need:
  1. A nail striper brush;
  2. A toothpick;
  3. A dotting tool (or you can use another toothpick);
  4. Some base/top coat nail polish;
  5. White nail polish;
  6. Pink nail polish.
   And here's all you need to do:
  1. Take a good care of your nails before applying any nail polish.
  2. Apply some base coat and let it dry for a few minutes.
  3. Paint all of nails two coats of any colored nail polish, but remember to wait between each layer.
  4. To make your scroll pattern:
    1. Make some diagonal lines with your striping brush, making diamond shapes. 
    2. With your toothpick, make four tiny spirals around the middle diamonds (like in the picture).
    3. Make tiny little lines in the remaining diamons.
  5. Make some big dots on the other two nails.
  6. After it all dried apply a shiny top coat to seal in your design and make it prettier and shining.

   And that's it! It's really simple to do and it looks amazing.

   Kisses
   Patrícia

Monday, July 7, 2014

Perfect Manicure

Hello everyone! 

  So, I've decided to make another post about how to paint your nails. This time is a little bit different from the one I've made last year (Daily Tip - How to paint your nails?), since I'll be telling you the way I do it. 
  To reach the perfect manicure, or pedicure, this is what you have to do:

1) Cleaning. Before you start painting your nails, it is always necessary to have them properly cleaned. After taking care of your nails (filing, fixing your cuticles, etc) get a cotton pad soaked in nail polish remover, and clean any extra fat you might have.

2) Base coat. After cleaning your nails, always wear a base nail polish. A base coat will protect your natural nails from discoloration and it will make your nail polish last longer.

3) Starting of. First of all, you apply a single drop of nail polish at the center of your nail.

4) Move your brush down, leaving a little space away from the cuticles to make your nails look longer.

5) After moving it down, move your brush up until the tip of your nail. Remember to only make vertical swipes.

6) From the same dot you've made before, paint your nails down - left and down - right to fill in all your nail. Repeat this in all of your nails.

7) Let it dry. Wait some time between painting each coat, and after you've painted all of your nails wait around 10 minutes to make sure it is fully dry.

8) Top coat. When they're all dried out, apply a fast drying top coat to give more shine to your nail and to make your nail polish last longer.

  And that's it! In just around 20 minutes you'll have the perfect flawless manicure you are always wishing for! I hope you've enjoyed this post.

  Kisses,
  Patrícia

Saturday, July 5, 2014

Glittering Blue Nails

Hello everyone!

  I'm finally on my school break, and now I have more free time to do whatever I like, such as painting my nails properly! 

  This past week, I wore "Glittering Blue Nails", with Kiko - 295 Cerulean Blue, that I recently bought, and some few silver glitter on top. It's simple, fast, and pretty. 
  All I needed was:
1) Base coat nail polish;
2) Cerulean Blue nail polish;
3) Silver Glitter nail polish;
4) Top coat nail polish.

  It's super simple, all you have to do after applying your base coat is to paint your nail with a couple of blue coats, grab the glitter polish and remove the excess from the brush (so that you can have glitter on your nail without making it thicker) and after it all dried, apply a top coat. And it's done.
  I hope you've enjoyed this week nail art.

  Kisses,
  Patrícia

Thursday, June 26, 2014

New nail polishes

Hello everyone! 

  I don't know if you all know this brand, but I have plenty of nail polishes from this brand, and it's one of the cheapest and with high quality nail polishes we have here in Portugal. It's "Kiko cosmetics - make up Milano"! They actually have stores in plenty of countries, mostly in Europe I believe. They do great promotions, all over the year, there's been a few times that they've made over 50% discount on all nail polishes, it's simply amazing!

  So, presented brand, I'll introduce to you my latest acquisition! 3 gorgeous nail polishes, the consistency of these nail polishes is great, one of the best I've ever used, with some of them one coat is enough, but if you want a perfect look two of them is just fine. They're long lasting and they super shining! Here's the latest nail polishes I've bought:
295 - Cerulean Blue;
343 - Spring Green;
361 - Raspberry Pink.
  295 - Cerulean Blue - It's a beautiful summer color, between blue and cyan. It's super bright and extremely pretty. My nails were great with just one coat on, but I applied a 2nd one to perfect their look. The consistency of this polish is great, not sticky and not liquid. It's perfect.
  343 - Spring Green - The color ain't that blue, as you can see in the first picture where the bottle is shown, but with the light I had it looks a lot more blue than it really is... In the dark it's much greener, it's a color between cyan and green. From all the 3 nail polishes, this one is my least favorite. It's too much liquid, you need at least two coats to make it look good... Just one is impossible! Anyway, it's a beautiful color to be worn during summer.
  361 - Raspberry Pink - It's a cute color caught between pink and red, it's the characteristic raspberry pink, there's not much to say about this color. Also suitable for wearing during summer. The thickness is similar to the Cerulean Blue that I talked about, but I don't like it as much. 

  And that's it! Hope you've loved these nail polishes as much as I do! 

  Kiss,
  Patrícia

Monday, June 23, 2014

Summer Nail Polish Collections

Hello everyone! 

  I don't really know how it is with all your different countries (because you guys are from all over the world) but here in Portugal, summer just started yesterday! Even though the temperatures are not delicious (I'm used to a hot weather, that's why I don't enjoy these rainy hot days) the colors that I wear on my clothes are more bright, shiny and cute... So I thought, why not going posting about some new nail polish collections? 

  And that's what I'm going to do! I'll introduce to you the brand new Summer 2014 Collections of Essie and O.P.I.! 

  From Essie, there's actually two collections that I'll be talking about, Essie - Summer 2014 and Essie - Neons 2014. I'll also talk about O.P.I. - Neon by OPI

Essie - Summer 2014 - "Want to stay haute in the heat? I've got the perfect shade. Essie" 
1 - Urban Jungle - "Irresistible alabaster orchid";
2 - Fierce, No Fear - "Intense cocoa mahogany";
3 - Roarrrrange - "Unstoppable, blod orange";
4 - Strut your stuff - "Compelling cobalt aqua";
5 - Ruffles & feathers - "Powerfull peacock teal";
6 - Haute in the heat - "Unforgettable hot guava". 

Essie - Neons 2014 - "Call me anytime nothing's too taboo between us. Essie" 
1 - Too taboo - "Florescent fushia berry";
2 - Chills & thrills - "Supercharged blue violet";
3 - I'm addicted - "Neon aquamarine blue";
4 - Vices versa - "Juicy neon lime";
5 - Serial shopper - "Florescent fire coral";
6 - Sitiin' pretty - "Vivid intense lavender". 

O.P.I. - Neon by OPI - "Go Neon... Or Go Nude."
1 - Life Gave Me Lemons;
2 - You are So Outta Lime;
3 - Juice Bar Hopping;
4 - Hotter than You Pink;
5 - Push & Pur-Pull;
6 - Down to the Core-al.

  From these three collections, my favorite is definitely Essie - Summer 2014, because I just love "Ruffles & feathers", that amazing aqua! I also love Essie - Neon 2014, but I wouldn't wear "Chills & thrills", 'cause it's a waaaay to bright blue. About the O.P.I. - Neon by OPI, I don't really think it's a really neonish collection, and the only one I actually like is "Life Gave Me Lemons" and I wouldn't wear the remaining colors. 

  Hope you've enjoyed this post. 

  Kisses, 
  Patrícia 

Friday, June 20, 2014

Purple Waterfall Nails

Hello everyone! 

  As I promised here are my weekly nails: 
  This is one of the colors I've chosen for you in my last post: Follow my blog with Bloglovin, from set #5 - 2nd color! It's a cute summer color more like a soft purple, it resembles to Essie - Play Date. It's a sexy, kind of flirty purple, and I simply love the way it looks on my nails! For my ring finger, I simply did a "waterfall effect" by using white as a base color, and then making random stripes (from the base of my nail to the tip) with 3 different colors: the same soft purple I used on my other nails, a neon blue and a neon orange, I also used a silver glitter to make it look more sexy. 

  It took me about half-an-hour to make these nails (applying base and top coat, and letting my nails dry before adding another coat), they are super easy to do and they look great! 

  Hope you've enjoyed these nails. 

  Kisses,
  Patrícia 


Tuesday, June 17, 2014

Follow my blog with Bloglovin

Hello everyone! 

  I'm sorry I haven't been posting anything in a while, but I had a few personal problems that caused me lack of time... I don't know how often I will be able to come here and post new updates, but I promise that from now on I will be doing it once in a while! 

  Lately, I haven't had any inspiration to make any new nail art designs, I can say that I'm a bit unmotivated... So, I've decided that everytime I remember, I'll show you what color are on my nails! And as it is summer time around here, there's tons of bright and cheerful colors that you can wear on your nails!

  With that being said I present you a few color combinations, inspired by some images, that I think that are perfect to wear during summer! Of course, there are tons of different shades, some more dark, other ones more bright, but these are the ones I want to show you for now:


  #1 Mostly consists in some nude colors, I chose these ones because not everyone has the possibility to wear super bright and fun colors on their nails. This set is composed by a dark green that resembles to a green lake water, where there's a huge amount of flora and living creatures. There's also this pink that is not as bright as most of you may wish, but it is a great color to wear during summer. The three remaining colors are basic nudes that you can use all year.


  #2 In continuation of the previous set, these colors are a little bit more bright, but still not entirely bright and neon. There's  this kinda darker green, resembling to an asparagus green that is smooth to wear and perfect for a professional look on your nails. I've chosen two bright colors for this set, that probably are the most seen ones: the light green and the hot pink. Last but not least I chose a very very very very cloudy super light pink to complete this set.


  #3 Is a completely different scenario. Inspired by a photograph taken in the Netherlands (not by me) I chose these 5 matching color. A brownish green and a dark pink, again, to wear during a more professional occasion, a kind of nude pink that is darker than the previous pink, and two different sky blues.


  #4 Is inspired by a peacock feather, going from a bit darker purple to a light one, from a really light blue so a super cute to wear blue and also a super almost white purple. These color are a lot more fun to wear than the previous ones and are definitely my favourite set. Not only because my favourite color is purple, but also because I love the way that these blues match with my skin tone. 


  #5 I don't think that yellow and orange matches my skin tone, but it looks amazing in certain people. Inspired by a summer sunset, I chose a really light sunny yellow that looks great if you have a tanned skin tone, as well as the orange. I also chose a deep sea blue, more like a dark blue with a purplish touch, because even though it is a dark color it can look great on your nails if you have a really light skin tone. Again, I've chosen two different shades of purple that can be seen in the sky of the picture. 

  Apart from the colors, my blog can now be followed using Bloglovin. So don't forget to follow me up: Everything-About-Nails-Bloglovin.

  Hope you've enjoyed my come back. 
  Kisses,
  Patrícia 


Monday, January 20, 2014

Day 11 - Polka Dots

Hello everyone! 

  As I promised, here I am a week later to upload my Day 11 - Polka Dots nails! It's a really fun design. And this is one in a million, 'cause when we talk about polka dots, we can talk about a million of different designs! And all of them beautiful! This is out my nails turned out to be: 


  Swirls! Why not mixing up polka dots with swirls? It's such a great idea, and I love it!.

To make this design you will need:
a) Base/Top coat nail polish;
b) Light purple nail polish;
c) White acrylic paint/nail polish;
d) Dark purple acrylic paint/nail polish;
e) Dotting tool. 

  And all you need to do is:


1) First of all, take a good care of your nails and apply a base coat. After that, paint all your nails with a light purple nail polish.
2) After it dryed, use a dotting tool to make a swirl made of white dots, just like the one I show you in the picture above. Be sure that fits another dot between your waves.
3) Now, with a dark purple, make another swirl in the opposite direction.
4) Let it all dry out and apply a top coat.

  And that's it! Super easy to do and really funny looking. Hope you've enjoyed this.

  Kisses, 
  Patrícia :)


Monday, January 13, 2014

Daily tip - A Few Recommendations

Hello everyone! 

  How are you all today? I hope you have a great week, starting today! Well, I've made a mistake recently, with my "31-Day Nail Challenge", I've missed a day and I didn't even noticed. I jumped from Day 10 - Gradient Nails straight to Day 12 - Striped Nails! It was a huge mistake, so my bad. I've already made my "Day 11 - Polka Dots", but I will only upload them next week. I hope you like them! 

  I came here with the purpose to give you some recommendations. As you know, I'm not even close of being an professional nail artist, all I do is for fun, and for your joy. Sometimes to make my nails I inspire myself in other nail artists, and as I don't want to take any credit for them, here's a small list of websites I follow and inspire myself: 

1 - Robin Moses Blog - she's an amazing nail artist and she was the one that got me into this nail thing.
2 - Miss Ladyfinger Website - she constantly uploads nail art related to the latest fashion trends, and it's really cool.
3 - Cult Cosmetics - well, this ain't a website with tutorials, it's more like a nail art/tools market. But I like to check them out once in a while to see what other artists are making.
4 - The Nailasaurus Website - this is a website I found on Facebook, and I believe the author makes some beautifull nails, so I enjoy checking it out.
5 - Nail Art Design Website - I've also found this on Facebook, and it's probably the website I follow the least. But it's also pretty good.

  So, I hope you like these nail artists as much as I do! I also follow some of them on the other social networks, but I have no need to share them here 'cause if you visit their websites you'll be able to find them right away. 

  Kisses,
  Patrícia :) 

Sunday, January 12, 2014

Suit And Tie Nails

Hello everyone!

  First of all I wish you a great 2014, or just like we say in portuguese: "Bom Ano!". 

  So, these are my very first nails I've made this year, and they look beautiful. they're not the prettiest I've made so far, but they're okay. I've inspired myself in Justin Timberlake's music - Suit and Tie (you can hear it here), 'cause he's coming to Portugal in a few months, and I felt excited with it. Here's how they turned out to be: 


  My nails are super small, as you can see in the picture above. I'm not the kind of person that wears fake nails, so even though my nails are short I keep painting them, it's harder but I still love it. 

  To make these nails you will need:
a) Base coat nail polish;
b) Black nail polish;
c) White nail polish;
d) Grey nail polish;
e) Striping brush;
f) Matte top coat nail polish.

  I've painted all my nails black, except for my middle finger. For this particular nail you will need to:


1) Take a good care of your nail and apply a base coat. Paint it white.
2) With a striping brush (or a toothpick) and black nail polish (or acrylic paint) make a shirt collar and a little tie.
3) After that, make a small suit jacket using the same materials.
4) To add more details, use grey nail polish and a striping brush to make the jacket flaps. After it dryed, apply a matte top coat to all of your nails.

  And that's it. Super easy to do and good looking aswell. I hope you've enjoyed.

  Kisses,
  Patrícia * 

Tuesday, December 31, 2013

2013 Year Review!

Hello everyone! 

  First of all, I want to wish you a great new year's eve and I wish you have an even better year than this last one. Happy 2014. 
  Now, as the year is ending, I felt like doing a 2013 review of this blog. 

  April:
1 - Leopard and Zebra Pattern;
2 - Black Nails With Fancy Roses;
3 - Green Nail with White Daisies;
4 - Psychedelic Neon Nails;
5 - Polka Dots And Glittery Nails.


  May:
6 - Gradient Nails;
7 - Chocolate And Vanilla Nails;
8 - Rainbow Nails. 


  July:
9 - Vintage Nails;
10 - Rainbow Marble Effect With No Water Needed;
11 - Party Nails. 


  August:
12 - Greenish Yellow Nautical Nails;
13 - Day 1 - Red Nails;
14 - Day 2 - Orange Nails;
15 - Day 3 - Yellow Nails;
16 - Day 4 - Green Nails;
17 - Day 5 - Blue Nails.


  September: 
18 - Day 6 - Violet Nails;
19 - Day 7 - Black and White Nails;
20 - Day 8 - Metallic Nails;
21 - Day 9 - Rainbow Nails;
22 - Day 10 - Gradient Nails. 


  November: 
23 - Winter Plaid Nails.


  December:
24 - Day 12 - Stripes;
25 - Snowflakes Nails.


  I hope you have enjoyed this year's nail art! 

  Kisses to everyone and I'll see you next year! 
  Patrícia *