Thursday, September 5, 2013

Day 8 - Metallic Nails

Hello everyone! :)

  As I promised here I am, a couple of days later from my last post, posting you my DAY 8 - METALLIC NAILS! Well, there ain't much things to do about metallic nails. The first thing I've made was a very complicated snake scales nails, and I didn't enjoyed them 'cause they didn't resemble to something metallic, only the base nail polish that I've used. So perhaps I will be using that design, later on, for my "Day 13 - Animal Print Nails". So, the only thing I've done for these nails was to paint them with a "Mirror Effect" nail polish. They have no designs at all, so I had no need to make a tutorial for you. 

  Here's how they look like: 


  It's a really beautiful metallic green, actually one my recent purchases. I've bought that nail polish to try it out and decide if I loved it or not... And I really fell in love with this green and with this shiny effect. Perfect for my skin tone and for summer. I wouldn't recommend using on Winter, but... You do what you want. I'll probably be using this nail polish as a base color of my "Day 13 - Animal Print Nails", because it really resembles me of a green snake scales. Amazing, right? 

  Thanks everyone!

  Kisses,
  Patrícia :)

Tuesday, September 3, 2013

Day 7 - Black and White Nails

Hello everyone! :)

 Well, as you can tell it's impossible for me to come here everyday, so I've decided that's I'll be posting my nails once each couple of days... So, today's challenge is: DAY 7 - Black and White Nails! And I've loved doing them. Black and white are the colors that have so much to draw about... So many choices, so many design that you can choose, it's amazing. Well, for these nails I've inspired myself in a checkers board, but still, I wanted to make my nails look like a bit different from checkers... This is how they look like: 


  Why not a black and white gradient similar to a checkers pattern? Awesome right?

  To do these nails you will need:
a) Base coat;
b) White nail polish and/or acrylic paint;
c) Black nail polish or acrylic paint;
d) Top coat;
e) Makeup sponge;
f) Striping brush.

  And all you need to do is:


1) Take care of your nail and apply a base coat. Paint your nail with white, as your base color.
2) With your makeup sponge, make a white to black gradient on your nail. Start with painting the bottom half of your nail black, and then the top half white. For these nails I've used acrylic paint 'cause it's easier to work with. But, if you don't want to use acrylic paint, you can add a few drops of nail polish remover or acetone to your nail polish, and it will also become a little thinner.
3) After removing all the polish around your cuticles, get your striping brush and make a few vertical stripes, all evenly spaced.
4) Now, make some horizontal stripes to make some small squares. Apply a top coat to seal your design.

  Impossible to be easier. Thanks everyone! 

  Kisses, 
  Patrícia :)

Sunday, September 1, 2013

Day 6 - Violet Nails

Hello everyone! :)

  Yesterday I had no time at all neither to come to my computer, neither to make my Day 6 - Violet Nails... So today, is Day 6 - Violet Nails from our challenge! If you don't remember each day category, check it out on my previous post "I'm BACK!", from August 24th. 

  Well, these nails have nothing compared to what I've made before, it's actually the first time I use this technic, and I'm not really sure if I love it or if I don't. It's all up to you. I've inspired myself in the olympics games symbol, making circles all around my nails, with some different colors. Here's how my Day 6 - Violet Nails look like:


  To make these nails you will need:
a) Base coat;
b) White nail polish;
c) Violet nail polish;
d) Purple nail polish;
e) Pink nail polish;
f) Top coat;
g) 1 straw and a scissor.

  About the straw


  You will need to cut three little pieces of your straw, using a scissor. Then, put some nail polish on your paper or anything like it, dip in a side of your little straw piece and then, very gently, apply it on your nail. 

  After cutting all the little pieces, you will need to do


1) Take care of your nail and apply a base coat. Paint your nail with two coats of white.
2) After letting your white polish completly dry, you will dip in one piece of your straw on your violet nail polish, and make a few circles on your nail.
3) With another straw piece, dip it in on your purple nail polish, and again, make a few circles.
4) Again, dip in a piece of your straw on your pink polish and make a few more circles. After it all dryed out, apply your top coat. 

  Extremly easy to do. But far from being my favorites. 

  Kisses, 
  Patrícia :)

Friday, August 30, 2013

Day 5 - Blue Nails

Hello everyone! :)

  I've let my nails rest for a day, 'cause I felt that putting then into acetone and nail polish remover every single day, kinda hurted them, so I've taken a day off from this challenge. But now, I'm back again!

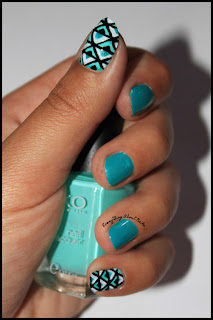
  Blue nails are the most common ones to wear, and there's actually tons of designs you can make using the blue color. I've already made a few tutorials with blue nails: Vintage Nails & Rainbow Nails. BUT, these ones are different from what I've made before.. I'm in a mood of stripes and patterns, so I've decided to inspire myself in diamond patterns. This is how my nails turned out to look:


  I've let my index finger, my middle finger and my ring finger with a simple blue, 'cause I've broken them during my vacations and they are extremely small. :(

  Well, to make these nails you will need:
a) Base coat;
b) Light blue polish;
c) Black polish;
d) Dark blue polish;
e) White polish;
f) Top coat;
g) Striping brush;
h) Tiny brush for details.

  And, here's how you make my diamond pattern nails:


1) Take care of your nail and apply base coat. Apply one or two coats of your light blue nail polish.
2) With your striping brush and your black nail polish, make some diamond shapes.
3) Cross your diamond shapes with a black stripe.
4) Make little triangles in each half of your diamond shape. Use your dark blue and your tiny brush.
5) Now with white, fill in the top half of your diamond shape. 
6) Repair all your black stripes to remove some fail from your nail, and also paint the bottom triangle of each diamond half. Apply top coat after drying.

  That's it, not so easy, but looking amazing! 

  See you all tomorrow. 

  Kisses, 
  Patrícia. 

Wednesday, August 28, 2013

Day 4 - Green Nails

Hello everyone! :)

  So, today is my 4th day at the challenge, and it's Green Nails Day! I've nothing to speak about this color, it's kinda far away from being my favorite... BUT, it didn't stoped me from doing a design that is cute and easy for short nails. 

  I've inspired myself through my Day 3 - Yellow Nails design, still, I wanted to make it look different from what I've made yesterday, so I've decided to make simple angled stripes, using some multiple tonalities of greens and especially neon green. Here's how my Day 4 - Green Nails look like:


  They're really simple to do and they look super bright and neonish, I'm getting kinda obsessed with that. Ahah :)

  To make these nails, you will need:
a) Base coat;
b) White polish;
c) Black polish;
d) Dark green polish;
e) Normal green polish;
f) Neon green polish;
g) Top coat;
h) Striping brush.

  Now, how to make them: (my image looks a bit small, so you're going to need to open it so you can see the steps more detailed) 


1) Take care of your nail and apply base coat. Paint one or two coats of white.
2) With your striping brush and your dark green nail polish, make an angled stripe touching your cuticles, leaving a white space between the stripe and the corners of your nail.
3) Make another stripe bellow the dark one, with a regular green nail polish.
4) With your neon green nail polish, make another stripe bellow the last one.
5) Now, with white, make another stripe bellow the other ones.
6) Keep making stripes bellow the white one, but in the reverse color order.
7) Once you're done with filling out your nail, fill in the remaining white on the corner of your nail with black. After drying, apply a top coat to make your design better looking.

  It is simple to do and you can mix up any color you wish, it will always look amazing.

  Thank you everyone.

  Kisses,
  Patrícia :)

Day 3 - Yellow Nails

Hello everyone! :)

  As I promised, here I am, late in the night, posting my Day 3 - Yellow Nails to you guys, 'cause you all deserve it. But it is my fault anyway, I've spent all day away from home, and when I finally came I still had to edit my pictures, and bla bla bla, so only at 12:30am I was able to come here and post these nails to you.

  I've seen this design before on the internet (I don't remember where), and I've decided to try it out myself, with some different colors, and at the end, I really enjoyed the final result! Here we go: 


  They remind me of this beautiful sunset I've seen the other day, so I'm reallyyyy in love with these nails. 

  So, to make these nails you will need:
a) Base coat;
b) White polish;
c) Red polish;
d) Orange polish;
e) Yellow polish;
f) Top coat;
g) Striping brush.

  And now, the tutorial


1) Take care of your nail and apply a base coat. After that, apply one or two coats of white for your base color.
2) With your striping brush, paint two red stripes on your nail, each one on the opposite side.
3) With orange nail polish, make two stripes next to the red ones.
4) Fill in the remaining white with your yellow nail polish.
5) Make a thin white stripe right on the middle on your nail.
6) Apply your top coat. When you apply it, you will notice that your colors will bend together and stay prettier.

  That's it, simple, easy and cute! 

  See you tomorrow.

  Kisses,
  Patrícia :) 


Tuesday, August 27, 2013

Day 2 - Orange Nails

Hello everyone! :)

  I'm extremely sorry for not updating anything yesterday, but my day was so crazy that when I got home, I was extremely tired to upload my Day 2 - Orange Nails... So today, I'll be posting Day 2 - Orange Nails, and later I'll be posting Day 3 - Yellow Nails. Is that okay with you all? I hope so.

  Now, for my Day 2 - Orange nails I was lacking imagination, but I've ended up with something good for my taste, and I think they're good looking nails, see it for yourself: 


  As I have made a tutorial about flowers before (in Vintage Nails), I felt that I had no need to make one again, but I'll remind you some steps and I'll tell you what you need to make these nails.


  All you need is:
a) Base coat;
b) White polish;
c) Orange polish;
d) Lighter orange polish;
e) Dark and Light green polish;
f) Glitter;
g) Top coat;
h) Brush for details.

 Step by step:
1) Apply a base coat on your nail. Apply one or two coats of white for your base color. 
2) Make some large circles with your orange polish.
3) With a little brush, make some details with a lighter orange and white nail polish to make it look more like a rose.
4) With the same little brush, make a few leaves with your dark and your lighter green polish. 
5) Apply glitter on top of your roses (not the leaves) and on the remaining white. Apply a top coat to seal your design.

  Easy, right? Thanks everyone.

  Kisses, 
  Patrícia :)

Sunday, August 25, 2013

Day 1 - Red Nails

Hello everyone! :)

  I've told you yesterday that I would accept a challenge that would last 31 days, and each it's ment to be different. I hope, that the end result of this challenge pleases me, so I can keep on accepting more and more challenges, and getting my nail arts mastered. Here's the challenge:


  So, today, being my first day, it's RED NAILS DAY! :) Here's the end result: 


  They're simple, and cute. And, has I promised, I've made a tutorial for these nails!

All you're going to need is
a) Base coat;
b) Red polish;
c) Yellow mostard polish;
d) Orange/Peach Polish;
e) Purple polish;
f) Gold glitter;
g) Top coat;
h) Dotting tool;
i) Striping brush.

  And you'll need to:


1) Take a good care of your nails, and apply a base coat. Apply two thin coats of your red nail polish. Let it dry completly.
2) With your striping brush and your yellow mostard nails, make some not perfect and random stripes over your nail.
3) Make a few stripes, on the left side of your yellow ones, with your orange/peach nail polish.
4) Again, on the left side on the yellow and orange stripes, make a few more stripes using your purple nail polish.
5) Apply a thin coat of gold glitter over your nail and let it dry. Apply a top coat to protect your design.

  Really simple and easy to do. You can mix up more colors, as you like.

  See you tomorrow!

  Kisses, 
  Patrícia :)

Saturday, August 24, 2013

I'm BACK!

Hello everyone! :)

  I'm finally back from my vacations and ready to strike again! It felt so good to have these past three weeks to completly relax and forget about all my problems. I went camping to Alentejo, a portuguese southern zone, and it was a-m-a-z-i-n-g. 

  I've got several sources of inspiration and now, i'll accept a 31-day nail challenge! 


  I'll be starting this challenge as soon as I can, and I'll do a tutorial of each nail I make every single day. It'll be cool. :) 

  Ow, I've also started a new page on WeHeartIt, so please, follow me and share my blog! Thanks everyone!


  See ya soon! 

  Kisses, 
  Patrícia :*

Friday, August 2, 2013

Greenish Yellow Nautical Nails

Hello everyone! :)

  So, this time I've chosen a color from this website, 'cause I felt like some people don't really know what color should use.


  I've used a Greenish Yellow nail polish, and I've loved it! Here's how they showed up looking: 


  All you'll need is:
a) Base coat;
b) Greenish yellow nail polish;
c) White nail polish;
d) Red nail polish;
e) Striping brush;
f) Dotting tool/Toothpick;
g) Top coat.

  They're extremely easy to do, I'll explain you how to do these hearted nautical nails:


1) Take a good care of your nail and apply a base coat. As you can see, my nails are all small, but it didn't matter.
2) Apply one or two coats of your greenish yellow polish.
3) With a striping brush, apply white stripes. Try to make them all with the same size and evenly spaced.
4) Apply a little heart on the right/left bottom corner of your nail with your dotting tool. Apply your top coat to protect your design.

  I won't be able to come here next month, because I'll be on vacations... 

  Thanks everyone!

  Kisses,
  Patrícia :)